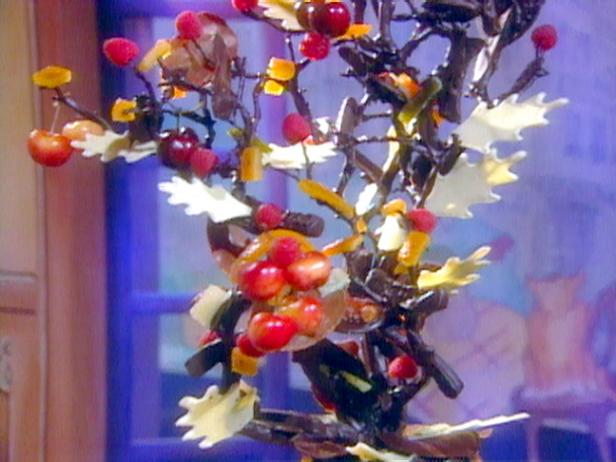
| Level: | Intermediate |
| Total: | 1 hr |
| Prep: | 1 hr |
| Yield: | 1 chocolate tree |
Ingredients
- Plain tree branches
- 32 ounces bittersweet chocolate, tempered
Instructions
- Using a very clean pastry brush, paint the branches with bittersweet chocolate until completely covered. (Of course, this does not make them edible!) You may need more than one coating. Place the coated branches on a sheet of parchment paper until the chocolate has fully set.
- For the base of this presentation, use a small plastic container as a mold, the size of which depends upon the size of the branches you’ve coated in chocolate. Center the branches inside the container and add bittersweet chocolate, filling it to the top. Allow to harden. When the chocolate has set, remove the plastic container. Use bittersweet chocolate to “glue” whatever you’ve chosen to hang from the tree. There is no set pattern, just let your eye guide you as you randomly decorate the branches. Use as many or as few as you like, depending on the size of your tree. It will look more interesting if color is added (i.e. fresh fruits, orange peels, white chocolate leaves, etc). Use the chocolate tree as a centerpiece for the dining room table during dinner. When it is time for dessert, your guests can simply pick the petit fours and candies from the tree.
- Assorted items to hang from the “tree”, for example: cookies, petit fours, fresh fruits such as cherries or raspberries, orange peels, white chocolate leaves, etc.
- How to Temper Chocolate(From Dessert Circus, Extraordinary Desserts You Can Make At Home by Jacques Torres):
- Chocolate is tempered so that after it has been melted, it retains its gloss and hardens again without becoming chalky and white (that happens when the molecules of fat separate and form on top of the chocolate). There are a variety of ways to temper.
- One of the easiest ways to temper chocolate is to chop it into small pieces and then place it in the microwave for 30 seconds at a time on high power until most of the chocolate is melted. Be very careful not to overheat it. (The temperature of dark chocolate should be between 88 and 90 degrees F, slightly warmer than your bottom lip. It will retain its shape even when mostly melted. White and milk chocolates melt at a temperature approximately 2 degrees F less because of the amount of lactose they contain.) Any remaining lumps will melt in the chocolate’s residual heat. Use an immersion blender or whisk to break up the lumps. Usually, chocolate begins to set, or crystallize, along the side of the bowl. As it sets, mix those crystals into the melted chocolate to temper it. A glass bowl retains heat well and keeps the chocolate tempered longer.
- Another way to temper chocolate is called seeding. In this method, add small pieces of unmelted chocolate to melted chocolate. The amount of unmelted chocolate to be added depends on the temperature of the melted chocolate, but is usually 1/4 of the total amount. It is easiest to use an immersion blender for this, or a whisk.
- The classic way to temper chocolate is called tabliering. Two thirds of the melted chocolate is poured onto a marble or another cold work surface. The chocolate is spread out and worked with a spatula until its temperature is approximately 81 degrees F. At this stage, it is thick and begins to set. This tempered chocolate is then added to the remaining non-tempered chocolate and mixed thoroughly until the mass has a completely uniform temperature. If the temperature is still too high, part of the chocolate is worked further on the cold surface until the correct temperature is reached. This is a lot of work, requires a lot of room, and makes a big mess.
- A simple method of checking tempering, is to apply a small quantity of chocolate to a piece of paper or to the point of a knife. If the chocolate has been correctly tempered, it will harden evenly and show a good gloss within a few minutes.
Reviews
a buitifull simple choco. centerpiece that willmakeany mealmore interesting
