| Level: | Intermediate |
| Total: | 2 hr 15 min |
| Active: | 1 hr |
| Yield: | 6 servings |
Ingredients
- One 2- to 3-pound chicken fryer, cut up
- 3 celery stalks
- 3 medium carrots, peeled
- 1 large yellow onion
- 4 tablespoons (1/2 stick) butter
- 1/4 cup all-purpose flour
- 2 cups low-sodium chicken broth or stock
- 1 chicken bouillon cube
- 1/4 cup white wine, optional
- 1/2 cup frozen peas
- 1 cup heavy cream
- 2 sprigs fresh thyme
- 1 teaspoon kosher salt, or more as needed
- Black pepper
- 1/2 recipe Thyme Pastry, recipe follows
- 3 cups all-purpose flour
- 1 teaspoon salt
- 1 1/2 cups (3 sticks) cold butter
- 1 egg
- 5 tablespoons cold water
- 1 tablespoon distilled white vinegar
- 1 sprig fresh thyme leaves
Instructions
- For the chicken: Start by putting the chicken in a pot and covering it with water. Bring the water to a boil, and then reduce the heat to low. Simmer for 45 minutes, and then remove the chicken from the pot. Set the chicken aside to cool briefly.
- Shred the chicken with 2 forks, reserving the bones. For the stock, return the bones to the pot and boil for 20 minutes. Remove the bones from the pot and discard.
- For the pot pie: When you’re ready to use the Thyme Pastry, remove from the freezer and allow it to sit on the counter to thaw slightly, about 20 minutes. Preheat the oven to 400 degrees F.
- Begin by finely dicing the vegetables. Slice the celery stalks into narrow strips, then slice in the other direction to create a fine dice. Repeat this process with the carrots, and the onion.
- Melt the butter in a large pot or Dutch oven over medium heat. Add the onion, carrots and celery. Saute until the vegetables start to turn translucent, a couple of minutes.
- Add 2 cups of the shredded chicken and stir to combine. Sprinkle the flour evenly over the vegetables and chicken, and stir to combine. Cook for a couple of minutes, stirring gently.
- Pour in the chicken broth, stirring constantly. Stir in the bouillon cube and wine if using. The flour will combine with the chicken to create a delicious gravy. Next, add the peas.
- Pour in the cream and stir. Allow the mixture to cook over low heat, thickening gradually, about 4 minutes. Season with the thyme, salt and pepper, and remove from the heat. Taste and adjust the seasonings as needed. Be sure it’s adequately salted!
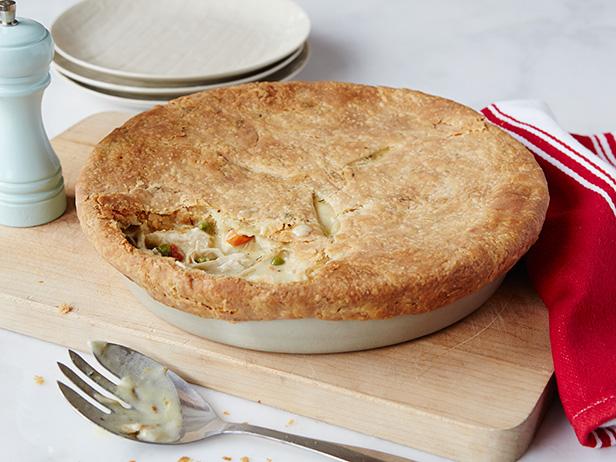
- Pour the chicken mixture into a deep pie pan or small casserole dish.
- Roll out the pastry so that it’s 1 inch larger than the pan. Place the crust on top of the chicken mixture and cut small slits in the top. Press the crust gently into the sides of the dish to seal. I don’t worry about making a perfect edge on my chicken pot pie because a) it looks more rustic and b) I’m lazy, hungry and I want to eat.
- Bake until the crust is golden brown and the filling is bubbly, about 30 minutes. Cool for 10 minutes before serving.
- To freeze: Allow the filling to cool completely then top with the crust. Cover with plastic wrap or aluminum foil and place in the freezer.
- To cook from frozen: Remove the pot pie from the freezer, brush with egg wash (1 egg mixed with 2 tablespoons water or cream) and place directly in a 375-degree F oven and bake until lightly browned and bubbly, 30 to 45 minutes.
- For the thyme pastry: Combine the flour and salt in a large bowl. Using pastry cutter, gradually work the butter into the flour until the mixture resembles tiny pebbles. This step should take 3 or 4 minutes.
- Lightly beat the egg with a fork, and then add it to the mixture. Next, add in the cold water and vinegar. Stir the mixture together until it’s just combined, and then remove half the dough from the bowl. (Dividing the dough in half results in two pretty generous pie crusts. If you desire a thinner crust, you may divide the dough into three crusts.)
- Place in a large plastic bag (do not seal) and slightly flatten with a rolling pin. This makes it much easier to roll out the crust later. After flattening, seal the bag tightly.
- Repeat with the other half of the dough and place the plastic bags in the freezer. I like to make several batches of pie crust at a time so I always have a crust ready to go.
- For recipes other than this pot pie, remove from the bag and place on a lightly floured surface. With a rolling pin, begin rolling the dough from the center, outward. Be gentle and patient; it’ll take a little time to get the dough completely rolled out.
- If you think the bottom is really sticking to the surface below, use a nice, sharp spatula to loosen it and sprinkle some extra flour on top. Then flip it over to finish rolling. Remember to roll from the center in single, outward strokes; no back-and-forth rolling.
- Again with a spatula, loosen and lift the pie crust and carefully lay it over a pie pan. Using your hand, lightly form the crust so that it fits inside the pan and overlaps the edges.
- Because it’s quick and easy, I just tuck the excess dough under itself above the rim. Then you can apply whatever decorative effects that you like to the edge. Or you can leave it plain if you’d like! Just tell yourself it’s more rustic that way!
- Fill the pie crust with filling and bake according to the pie recipe’s directions. Or, for a pre-baked crust, fill with pie weights (or pinto beans placed on aluminum foil) and bake at 400 degrees F until golden, about 10 minutes.
Nutrition Facts
| Serving Size | 1 of 6 servings |
| Calories | 1335 |
| Total Fat | 99 g |
| Saturated Fat | 51 g |
| Carbohydrates | 63 g |
| Dietary Fiber | 5 g |
| Sugar | 5 g |
| Protein | 48 g |
| Cholesterol | 356 mg |
| Sodium | 1131 mg |
Reviews
The filling of this pot pie is what cold day dreams are made of. This is one of those dishes I make and freeze to give as a gift for friends who are expecting or who could just use a nice hug of a meal when life is little rough — it’s really excellent.
So good during winter months. I use ready made crusts for top and bottom. The only pot pie my kids will eat .
This recipe takes some time but it’s worth it. My daughter said it was the best chiclet pot pie she had ever eaten. The creamy sauce is scrumptious and the crust with thyme added is to die for. If you take the time to make it you can serve it proudly. Possibly Ree’s best recipe. It’s that good.
Why didn’t she put the crust on the bottom of the pan and some to cover the pie, it may taste better..!
Delicious and fairly easy. I used a traditional crust, but will do the thyme crust nest time.
So delicious- the thyme pastry crust is so yummy!!
This is my 19-year old daughter’s favorite dish. She requests it each Thanksgiving and Christmas. It’s also one of the stars of the holidays with friends and family. Love it!
Excellent taste, followed directions perfectly. But is it a thyme crust in theory? Where did you add the thyme??
I have made Ree’s pot pies from her dinner time cookbook many times and expected this recipe to be more similar to that, but it isn’t. The filling on this one is a little bland, and as other reviewers have stated, soupy. I even cooked it down a little longer to try to achieve a thicker filling. The crust is doable but if you don’t already know how to make pastry crust, probably a little difficult to do based on the instructions. The instructions also do not say when to add the thyme to the crust, so I chose to add it with the egg. However the crust is the star of the show on this one. Filling needs something to kick it up a notch.
This recipe is a great staple! There are never any leftovers. And the crust is so buttery and flakey. Truly a keeper.