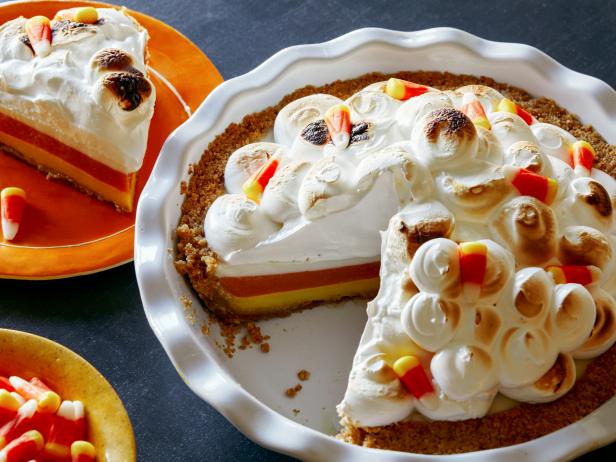
This candy corn-themed pie looks just like your favorite Halloween sweet. The colorful layers are tinted naturally with lemon juice, fresh mango and coconut milk, which also lend tropical flavors. The sweet pie is piled high with fluffy meringue that’s toasted with a kitchen torch until browned in spots and then decorated with real-deal candy corn, for a spookily showstopping dessert.
| Level: | Advanced |
| Total: | 5 hr 15 min |
| Active: | 1 hr 30 min |
| Yield: | 8 servings |
Ingredients
- 2 cups finely ground vanilla wafer cookies, such as Nilla Wafers (about 65 cookies)
- 1/4 cup sugar
- Pinch kosher salt
- 1 stick (8 tablespoons) unsalted butter, melted and cooled slightly
- 1/4 cup freshly squeezed lemon juice (from about 2 lemons)
- One 1/4-ounce packet unflavored gelatin powder
- 3/4 cup canned lite coconut milk
- 3 tablespoons sugar
- 1/4 teaspoon ground turmeric
- Pinch kosher salt
- 1/4 cup plus 1 tablespoon freshly squeezed orange juice (from about 2 oranges)
- One 1/4-ounce packet unflavored gelatin powder
- 1 cup mango chunks (thawed if frozen; if using fresh, from 1 peeled and pitted mango)
- 1 tablespoon fresh raspberries (about 3)
- 3 tablespoons sugar
- Pinch kosher salt
- 1 cup canned lite coconut milk
- One 1/4-ounce packet unflavored gelatin powder
- 3 tablespoons sugar
- 1/4 teaspoon pure coconut extract
- Pinch kosher salt
- 3 large egg whites, at room temperature
- 1/3 cup sugar
- 1/2 teaspoon cream of tartar
- 1/2 teaspoon cornstarch
- 1/2 teaspoon pure coconut extract
- Candy corn, for decorating
Instructions
- For the cookie crust: Preheat the oven to 350 degrees F. Stir the cookie crumbs, sugar and salt together in a medium bowl until combined. Stir in the butter and continue to mix until the mixture looks like wet sand and holds together when pinched.
- Firmly press the crumb mixture into the bottom and up the sides of a 9-inch deep-dish pie plate. Bake until the crust is set and lightly toasted, 12 to 15 minutes. If the crust puffs while baking, use the bottom of measuring cup to gently press the crust back down while it’s still warm. Cool completely.
- For the lemon filling: Once the crust is cool, combine the lemon juice and gelatin in a small microwave-safe bowl and set aside to let gelatin soften, about 5 minutes. Meanwhile, add the coconut milk, sugar, turmeric and salt to a blender and blend on medium speed until combined. Microwave the juice-gelatin mixture until just hot and liquefied, about 30 seconds. Stir to make sure the gelatin is dissolved, then add to the coconut-milk mixture in the blender and puree until smooth. Strain through a fine-mesh sieve into the cooled crust, then refrigerate until set, about 45 minutes.
- For the mango filling: Combine 1/4 cup of the orange juice and the gelatin in a small microwave-safe bowl and set aside to let gelatin soften, about 5 minutes. Meanwhile, add the mango, raspberries, sugar, salt, and remaining 1 tablespoon orange juice to a blender and blend on medium speed until smooth and combined, scraping down the sides of the jar with a rubber spatula as needed. Microwave the juice-gelatin mixture until just hot and liquefied, about 30 seconds. Stir to make sure the gelatin is dissolved, then add to the mango mixture in the blender and puree until smooth. Strain through a fine-mesh sieve directly on top of the set lemon layer, pressing on the solids in the sieve with a rubber spatula to extract as much filling as possible. Spread into a smooth and even layer using an offset spatula, then refrigerate until set, about 45 minutes.
- For the coconut filling: Combine 1/4 cup of the coconut milk and the gelatin in a small microwave-safe bowl and set aside to let gelatin soften, about 5 minutes. Meanwhile, add the remaining 3/4 cup coconut milk, sugar, coconut extract and salt to a blender and blend on medium speed until combined. Microwave the coconut milk-gelatin mixture until just hot and liquefied, about 30 seconds. Stir to make sure the gelatin is dissolved, then add to the coconut mixture in the blender and puree until smooth. Strain through a fine-mesh sieve directly on top of the set mango layer, then refrigerate until the filling is firmly set and with only the slightest jiggle when moved, at least 2 hours or up to overnight (wrap tightly in plastic wrap).
- For the toasted meringue topping: Combine the egg whites, sugar, cream of tartar and cornstarch in a large heatproof bowl. Set the bowl over a medium saucepan of simmering water (do not let the bowl touch the water) and cook, whisking constantly, until the sugar dissolves and the egg whites are warm to the touch, 3 to 4 minutes. Remove the bowl from the heat and beat with an electric mixer on medium-high speed until the mixture is light and fluffy and stiff peaks form, about 4 minutes. Beat in the coconut extract, then transfer to a piping bag fitting with a round pastry tip.
- Pipe 1-inch dollops of meringue on top of the pie, layering upward as you go, until all the meringue is used. Use a small kitchen torch to toast the meringue until deep golden brown. Nestle candy corn throughout the toasted meringue, then cut into wedges to serve.
Nutrition Facts
| Serving Size | 1 of 8 servings |
| Calories | 519 |
| Total Fat | 25 g |
| Saturated Fat | 12 g |
| Carbohydrates | 69 g |
| Dietary Fiber | 1 g |
| Sugar | 33 g |
| Protein | 6 g |
| Cholesterol | 31 mg |
| Sodium | 247 mg |
Reviews
I can only say “OH WOW!” My guests were very impressed with this dessert. My better half declared it a keeper.
I like the concept, but the negative reviews and ingredients list made me wary, so I changed the recipe. I swapped a traditional pie crust for the cookie crust and blind baked it. For the filling I used fruit curd, one with mango puree and the other with pineapple juice. No need for gelatin, which I think often leads to an undesirable texture, especially for a pie. Just let the yolks provide the thickness. You could use haupia for a third layer if desired, but I don’t think it’s necessary. I only had the two layers and finished off with a simple meringue topping. No candy. Everyone who tried it enjoyed it.
Creative idea. I didn’t actually try the recipe though, so I can’t speak to that. Tried to be neutral on the rating.
I was super excited to try this recipe but…. It too way too long for a gelatinous tangy weird tasting pie. The best part was the meringue and it was visually appealing. I recommend that you only make this if you’re extremely bored or if you love gelatinous textures.
Delicious and time consuming. It’s pretty sweet but not overwhelming. There was too much butter in the crust so it collapsed into a molten pool in the center, but I scooted it to the sides as it cooled and it was okay. Definitely use less butter on the crust, but it looks so cool it’s worth the time.
Definitely took some time to make, but the pie turned out super cute and tasted great!
So cute
I don’t need to taste this to know it’s not gonna be for me. It looks like someone made a Fall/Halloween pie and added an asian fusion twist to it. It’s nice for those who want to experiment with things, but I’m a traditional sort, so this recipe is definitely not for me.
Don’t make it it tastes really bad and the crust is to sweet