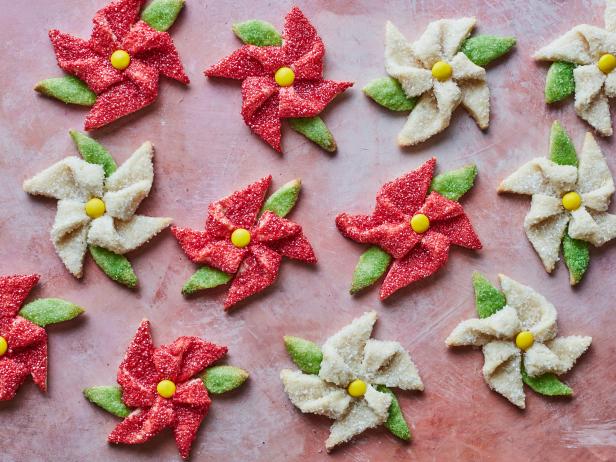
Despite the intricate design, these festive pinwheels are simple to create. The cream cheese in the cookie dough adds just the right amount of pliability, so you can cut, fold and shape with ease. We decorated the cookies with white, red and green coarse sanding sugar, sometimes called pearlized sugar, but you can feel free to swap in plain confectioners’ sugar. They’ll look stunning either way!
| Level: | Intermediate |
| Total: | 4 hr 30 min |
| Active: | 55 min |
| Yield: | about 18 cookies |
Ingredients
- One 8-ounce package cream cheese, at room temperature
- 2 sticks (1 cup) unsalted butter, at room temperature
- 3 tablespoons granulated sugar
- 2 3/4 cups all-purpose flour, plus more for dusting (see Cook’s Note)
- 1/2 teaspoon fine salt
- Red coarse sanding sugar, for decorating
- White coarse sanding sugar, for decorating
- Green coarse sanding sugar, for decorating
- 18 to 20 yellow candy-coated chocolates, such as M&Ms
Instructions
- Beat the cream cheese, butter and granulated sugar in a large bowl with an electric mixer on medium-high speed until light and fluffy, about 2 minutes, scraping down the bowl with a rubber spatula as needed.
- Reduce the mixer speed to low and beat in the flour and salt until combined. Divide the dough between 2 large pieces of plastic wrap. Flatten each into a 1/2-inch-thick disk and wrap. Refrigerate until firm, at least 1 hour and up to overnight.
- Preheat the oven to 350 degrees F. Line 2 baking sheets with parchment.
- Roll out 1 disk of dough on a lightly floured surface until about 1/8 inch thick, dusting with more flour as needed.
- Cut out 3-inch squares using a sharp paring knife or a 3-inch square cutter (you should be able to get 6 or 7 squares). Lift the cutouts using an offset spatula and arrange 2 inches apart on one of the prepared baking sheets. Re-wrap and refrigerate the dough scraps while you shape the pinwheels.
- Cut a 1 1/2-inch slit in all four corners of each dough square to form 8 points. Fold over every other point and press into the center of the square. Refrigerate while you make the leaves.
- Cut enough leaves out of the scraps using a sharp paring knife or a leaf-shaped cutter, making 2 leaves for each pinwheel. Arrange the leaves on the other prepared baking sheet. Lightly brush with water and sprinkle with green sanding sugar. Set aside in the refrigerator.
- Lightly brush the pinwheels with water and sprinkle half with red sanding sugar and half with white sanding sugar. Brush the end of 2 leaves and tuck underneath a pinwheel on opposite sides. (No need to press the dough; it will meld together as it bakes.)
- Bake, rotating the baking sheet halfway through, until the cookies are puffed and the edges are golden, 20 to 25 minutes. Immediately press a chocolate candy in the center of each warm cookie. Let cool 5 minutes, then transfer the cookies to a wire rack to cool completely.
- Repeat with the remaining disk of dough, and any remaining scraps, to make more cookies.
Nutrition Facts
| Serving Size | 1 of 18 servings |
| Calories | 475 |
| Total Fat | 25 g |
| Saturated Fat | 16 g |
| Carbohydrates | 57 g |
| Dietary Fiber | 2 g |
| Sugar | 38 g |
| Protein | 5 g |
| Cholesterol | 47 mg |
| Sodium | 137 mg |
Reviews
Since many folks are saying these cookies are not sweet, perhaps adding vanilla will help and or use a reliable sugar cookie dough..just a suggestion.
Okay, up front I am a “meh, that’s good enough” baker – my cookies are usually more cute than gorgeous. Here’s what I found with this recipe:
The center parts don’t stick great. I pressed them hard before baking, made the cookies thin as possible, and opened the oven twice to squish them back into place. Even still I lost lots.
There’s no good time to add the centres. They fall off either way.
They’re not a very sweet cookie, they’re nice and light. I did add vanilla, and to me, they had good flavour.
The sanding sugar takes a lot of work to get them to look like the pics. Mine look like a watercolor painting by a grade 4 kid. Cute, not gorgeous.
I’d say they’re a bit harder than the recipe implies to get them to look that nice.
Haven’t baked these yet but never seen a cookie recipe with no vanilla. Surely it must have been left out. I’ll make them but with vanilla added since I don’t bake cookies without it.
Thought these were so pretty but after watching the video for 45 min ( Finally wandered off – I made myself a piece of toast and went to the bathroom and she hadn’t even gotten to the shaping part)( 45 min of my life I will never get back) on how to make these. I don’t think I will try if they have no flavor. Don’t know how many stars to give it since I didn’t make them but I figure to give her 3 stars for effort.
I just made these and they taste like nothing. I don’t know if the recipe I printed was incomplete or what but, they are not good at all. Also the dough is so hard after being chilled, neither husband or myself could roll it out. We had to let it soften first. ??? Like I said maybe the printed recipe was wrong?? I will not make them again. I will probably toss them.
Wish I had read the reviews first. Needed 24 cookies for a swap so I made a double batch. Looked very pretty, but tasted like nothing! Threw them in the trash.
I see a lot of comments about the cookies tasting bland. I’m making these cookies next weekend and wonder if I can add lemon or orange zest to the dough for additional flavoring?
Cookie dough was too hard to roll out so had to allow it to warm on counter. Left in refrigerator for 4 plus hours as was stated could be overnight. Not much taste either so will not make again.
They are show stoppers!
Made them with my grandson and we had a great time. Cookies are good and very easy to make. I’ll use this recipe for the sugar cookies we ice and decorate