| Level: | Intermediate |
| Yield: | 8-10 servings |
Ingredients
- Cooking spray
- 1 18.25-ounce box chocolate cake mix
- 4 large eggs
- 1 cup buttermilk
- 1/2 cup vegetable oil
- 1 16-ounce tub milk chocolate frosting
- 3/4 cup vanilla frosting
- 1 1/2 cups sweetened shredded coconut, toasted
- Dried fruit, for garnish
Instructions
- Preheat the oven to 350 degrees F. Spray one 6-inch cake pan and two 1-quart ovenproof bowls with cooking spray. Beat the cake mix, eggs, buttermilk and vegetable oil with a mixer.
- Divide the batter evenly among the pan and bowls; bake until a toothpick comes out clean, about 25 minutes for the pan and 35 minutes for the bowls. Cool; unmold.
- Trim all 3 cakes to make them level. Hollow out the smaller end of one of the bowl cakes, carving about 1 inch deep. (Leave a thick rim around the edge.)
- Put the uncut bowl cake, wider side up, on a cake board or plate. Spread with a layer of chocolate frosting, then position the round cake on top.
- Spread the round cake with frosting, then put the other bowl cake on top, carved part up. Freeze the cake about 1 hour (this will make it easier to frost).
- Frost the outer rim and inside of the hole with vanilla frosting (an offset spatula works best). Put the remaining vanilla frosting in a resealable plastic bag.
- Spread the remaining chocolate frosting over the outside of the cake. Press handfuls of
- toasted coconut into the frosting, covering the cake completely.
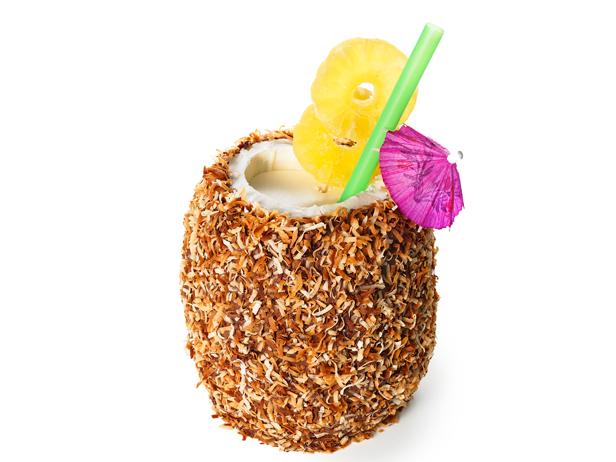
- Microwave the bag of vanilla frosting for 5 seconds (the bag will not melt). Snip off a corner and squeeze the frosting into the top of the cake so it looks like liquid.
- Thread dried fruit onto a wooden skewer and insert it into the cake. Add a cocktail umbrella and straw.
Nutrition Facts
| Serving Size | 1 of 10 servings |
| Calories | 712 |
| Total Fat | 40 g |
| Saturated Fat | 11 g |
| Carbohydrates | 88 g |
| Dietary Fiber | 2 g |
| Sugar | 66 g |
| Protein | 7 g |
| Cholesterol | 75 mg |
| Sodium | 659 mg |
Reviews
I followed this recipe exactly and it turned out great! I had a Hawaiian theme BBQ to bake a cake for and this was perfect! I baked a test cake 1st because I was nervous about how it would turn out. I shared the prototype with my coworkers and everyone raved about it. The final cake was the star of the BBQ as well. People from other picnic tables were coming over to admire the cake. The shape of my cake was more rounded (vs. elongated like in the pictures but I didn’t mind since it’s more realistic looking as a large coconut. This was so much fun to bake!
I made this for my friends b-day and she LOVED IT!!!! A bit of a challenge but fun.
I made this for a family friend and her family LOVED IT!! It was super fun to make. Putting it together was a bit of a challenge but it was worth it!
i made this for my sister’s birthday and it turned out great! i also used a little umbrella and a fun swirly straw for a decoration. the cake was so good – very moist and delicious!
I made this cake for a girl I work with for her return to work from her honeymoon. I added a silk flower at the bottom and one of those little paper drink umbrella and used a little yellow food coloring to make the ‘drink’ look different from the white rim. It came out wonderfully!
Just purchased all of the ingredients. Hope it comes out great. Surprised that This isn’t something from Semi-Homemade. 😉
I made this cake for a four of July party and put a flag on the end of the straw. I was really good and tasted a bit like german chocolate. I will say finding a 6 inch cake pan was a challenge so I just used all glass bowls and it worked great.
Great! Im no baker, but I figured this out! My dad loved it, even though it didnt look as perfect as the one in the picture…I just couldnt get the corners of the coconut rim as sharp as in the pictures! It looks like real coconut in the magazine, but on mine it looks frosted. Oh well, people still thought it was amazing! Oh, and a sidenote: I used fresh pineapple rings instead of dried, because I was in a pinch. I just patted them as dry as I could with paper towels and then let them air dry overnight. Im sure no one wanted to eat them, but they looked and worked perfectly.
I guess I am not a baker because mine looked like a volcano. It was hard but tasted good.
mm