| Level: | Easy |
| Total: | 3 hr 20 min |
| Active: | 30 min |
| Yield: | 12 to 15 servings |
Ingredients
- Nonstick cooking spray
- One 3-ounce box berry blue gelatin, such as Jell-O
- 2/3 cup boiling water
- 1/8 teaspoon black gel food coloring
- Four 11.1-ounce boxes plain no-bake cheesecake mix
- 4 1/2 cups milk
- 1 stick (8 tablespoons) unsalted butter, melted
- 1 1/2 teaspoons red gel food coloring
- 1/4 cup sugar
- One 0.67-ounce tube red writing gel
- One 21-ounce can cherry pie filling
Instructions
- For the pupil and iris: Spray a 3-quart mixing bowl with nonstick cooking spray. Combine the blue gelatin with the boiling water in a small bowl and mix until the gelatin is completely dissolved. Pour 1/4 cup of the gelatin into a second bowl and mix in the black food coloring. Set the remaining blue gelatin aside. Pour the black gelatin into the prepared bowl.
- Place in the refrigerator to set, about 30 minutes. Use a 2 1/4-inch round cutter to cut the gelatin into a circle and carefully remove the excess gelatin from around the outside of the cutter to leave a “pupil” in the bottom of the bowl. Discard the excess gelatin.
- Pour 1/4 cup blue gelatin into the bowl over the black pupil (if the blue gelatin has set before pouring, pop it in the microwave for 10 to 15 seconds to loosen it). You will have some excess blue gelatin. Place the bowl back in the refrigerator to set another 30 minutes.
- For the eyeball and crust: Combine the cheesecake mixes and milk in a large bowl. Blend with an electric mixer until thick but still pourable, about 2 minutes. Pour the batter into the bowl over the pupil and iris. Gently drop the bowl on your counter a few times to release any air bubbles. Place in the refrigerator and let set for 1 hour.
- Meanwhile, mix together the melted butter and red gel food coloring and whisk to ensure that the food coloring is completely blended into the butter. Combine the sugar, red melted butter and 2 bags of the crushed graham crackers that came with the no-bake cheesecake mix in a bowl and mix with an electric mixer on medium-low speed until the graham cracker crumbs are colored red, about 2 minutes.
- Remove the eyeball from the refrigerator and press the crust on top. Place the entire eyeball cake back in the refrigerator to let the crust harden, about 1 hour.
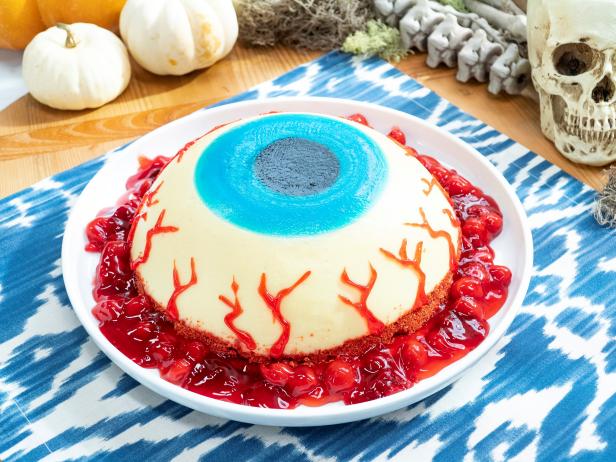
- To plate and garnish: Place a large round plate or platter over the bowl with the eyeball cake. Flip the bowl over so the bowl is on top of the plate. Gently tap the bowl and plate on the counter to help release the eyeball. Gently remove the bowl to reveal the eyeball cake (if the cake does not release from the bowl, dip the bowl in warm water to help it loosen).
- Use the red writing gel to make branching lines around the eye to resemble the veins of a bloodshot eye. Spoon the cherry pie filling around the entire base of the eyeball (you may not use the whole can).
Nutrition Facts
| Serving Size | 1 of 14 servings |
| Calories | 506 |
| Total Fat | 32 g |
| Saturated Fat | 15 g |
| Carbohydrates | 48 g |
| Dietary Fiber | 1 g |
| Sugar | 32 g |
| Protein | 8 g |
| Cholesterol | 75 mg |
| Sodium | 467 mg |
Reviews
Was the hit of our Halloween party! Very tasty and easy to make. I just need to find a shallower bowl to make it in. Would have liked to post a pic!
Wowwwww!!!!
Loved the recipe. I would add a tad more melted butter to the crust. I hard a hard time un-molding, tips would be appreciated. Overall it was super easy (minus the un-molding).
This was way easier than the Eyeball Lava Cake and to find the candies and buy the whole bag isn’t worth it unless you have little ones around. They also don’t microwave that easy. So for this Eyeball Cake the main problem most people have is not spraying the bowl enough so it unmolds easily, don’t use a plastic bowl a metal or ceramic works much better. Last but no least the size of the bowl to use. I was going to go out and buy a bowl until I looked at my 3 quart ceramic salad bowl. So I measured it so I hope this helps. The bottom of the bowl is about 41/2 inches wide and the bowl at the top from side to side is 10 inches. About half way the bowl is 8 inches. I used my sewing tape measure not a regular one for construction. So if you want to see if it will be a good bowl to use take 5 cups of water heat it with some corn starch or flour so it a pourable paste. Remember to spray the bowl then pour it in the bowl that will show you high on the bowl it will be and the look of a eye is good or the bowl is to big at the bottom or too flat. Put in the frig so it hardens a little and unmold it if you like the way it looks make the cake. Hope this helps.
Did not have a metal bowl to use. Used a ceramic bowl instead. Also did not immerse in warm water to un-mold- others were helping me and missed this step! It came out great and was a party hit!
Easy and tastes great.
Hit with the grandkids
This recipe was the hit for our Halloween celebration at work. The eye ball ran a little when I had to put metal bowl in warm water to help unmold, but it actually made it even more haunting. Everyone liked it so much and it was so easy to make, it will be an annual tradition. I preferred strawberries instead of cherries to garnish around cake. I also added chocolate dipped strawberries around cake in case people were afraid to eat cake. It was delicious. Next year may try a green eye.
I made this for Halloween and brought it in to share at work. Everyone loved it! It was easy to make and fun. I used a plastic bowl with no trouble but it may have had a flatter bottom. Don’t forget to loosen the crust around the sides with a metal knife or spatula before you flip it onto a platter. Thanks Sunny!
My eyeball looked more like a Salvador Dali eyeball. The unmolding was my undoing. Maybe I need a sous chef…or ten like your chefs have.