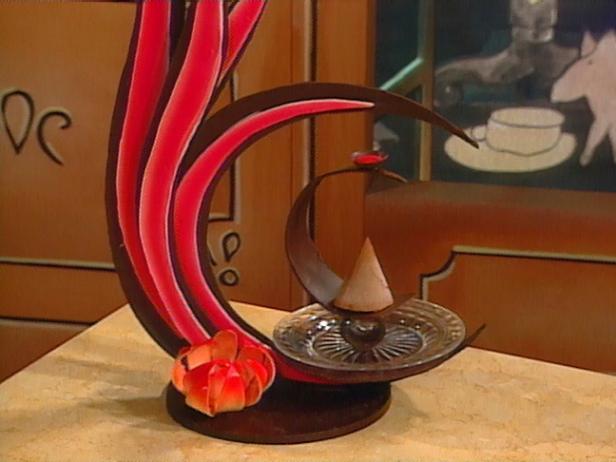
| Level: | Advanced |
| Total: | 5 hr |
| Prep: | 5 hr |
| Yield: | 1 centerpiece |
Ingredients
- 5 pounds bittersweet chocolate, tempered
- 3 pounds white chocolate, tempered
- Cocoa butter
- Powdered food coloring, as desired
Instructions
- Draw the design you would like to make on a piece of paper. Transfer the design to foam board and cut out the pieces. It is helpful to construct a 3-D version of your centerpiece before you make it from chocolate. You can make any design and any size you like. My centerpiece design included a large moon with a flame and other flame pieces. Then I made a total of 4 thin single flames and 4 thick double flame pieces. The tallest flames I made were about 28 inches long with 3 progressively shorter flames. Trace the foam board design onto the rubber mat and cut out the moon design to make the template. Repeat to make the flame designs. Make the moon design and the flames in dark chocolate: Place the rubber mat moon design cut out on a parchment paper lined surface. Use a ladle to fill the cut out with chocolate. Allow the chocolate to set. When the chocolate has set, peel away the mat. Repeat to make other flame pieces. Make a base: Use flexible aluminum strips or cake ring to form a base. The base I made was 10 inches in diameter. Place it on a parchment paper lined surface. Pour tempered dark chocolate inside the ring to form a 3/8-inch-thick layer. When the chocolate has set, remove the ring and peel off the parchment paper. Make the chocolate plate: Use an offset spatula to spread a 1/4-inch-thick layer of tempered dark chocolate over a 10-inch sheet of acetate. Let the chocolate set slightly. Use a paring knife to trace around an 8-inch cake circle. When the chocolate is set, peel off the acetate. Make the white chocolate moon design and the thin flames: Use the templates for the moon and flames as a guide and draw slightly thinner versions of these things onto acetate. Cut out the acetate pieces. Use an offset spatula to spread a 1/4-inch-thick layer of white chocolate over the acetate pieces. When the chocolate has set, remove acetate from the chocolate piece and place each one on top of its existing dark version. Use tempered chocolate to glue each 1 into place. Use an airbursh to paint the white chocolate pieces red.
- Make the chocolate flowers: Each flower consists of about 13 or more petals. Some petals are about 3-inches long while others are about 4 inches long. I used a lot of flower petals so I made my own petal templates. To do this, I drew the shape of the petal at 1 end of a piece of plastic (like plastic from the side of a bucket) that was about 10 inches long and 5 inches wide. Repeat to draw as many petals as will fit on the plastic. Use an X-acto knife to cut out the petals. Repeat to make another template for the 3-inch petals. Place the template on a piece of parchment paper. Use an offset spatula to spread a 1/8-inch-thick layer of tempered white chocolate over the template. Let the chocolate set slightly. Lift the template from the chocolate. Place the parchment paper over a rolling pin to give the petals a slight curve. You will need petals of varying degrees of curves. Make as many petals as you will need to make as many flowers as your design requires. Assemble the flowers: I used a plastic dome mold to give my flowers their final shape. You could also use a small glass bowl. Place a small dollop of white chocolate in the bottom of the mold. Add petals resting the ends in the chocolate and the tops along the side of the bowl. Add another layer. Continue this process to make as big of a flower as you like. I used the petals with the sharpest curve for the inside layer. When the chocolate has set, pop the finished flower out of the mold. Use an airbrush to paint the flower. Assemble the centerpiece: Use tempered chocolate to adhere the moon design to the base. Use more chocolate to adhere the flames to the base. I glued 1 flame slightly behind the moon design piece and the other slightly in front of the piece. Use more tempered chocolate to glue the flower to the base at the front. Determine the points at which the chocolate plate will rest inside the base of the moon design. Use a hot paring knife to create a 90-degree indentation on the inside of the moon. To do this, heat the knife under very hot water and wipe it dry. Hold the knife blade against the side of the chocolate where you want to make the cut. Do not press on the knife or the chocolate will break. Allow the heat of the knife to “cut” through the chocolate by melting it. Create the same type of indentation on the plate where it will rest near the tip of the moon. Balance the plate into the spot you have created using the tempered chocolate to glue it into place. If you are using this as a dessert display, place any dessert that you have on the chocolate plate.
- Sources: Chocolate Melter: Demarle New Jersey, Demarle.com Chocolate Cold Spray: PCB in France 011 33 0388 587333 Foam board: any art supply store Rubber mat material: hardware store
Reviews
i felt like a cooking god to show this off and yes it tast great!!!!!!!!!!!
