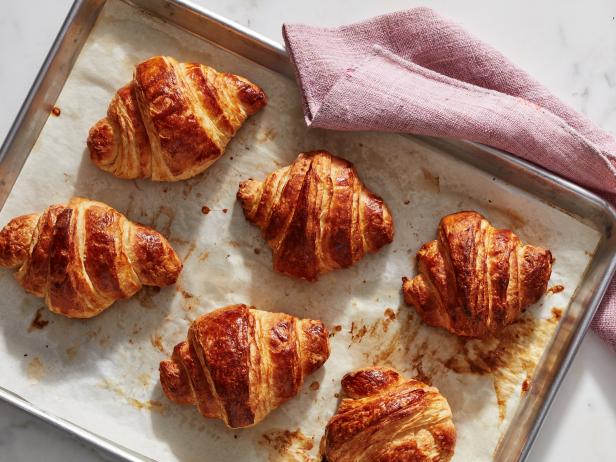
Rich, buttery and utterly delicious, these flaky croissants will undoubtedly impress anyone who’s lucky enough to snag one. They do require a time commitment, but once you smell them freshly baked from the oven, you’ll know it was worth every minute.
| Level: | Advanced |
| Total: | 18 hr 40 min |
| Active: | 1 hr 30 min |
| Yield: | 15 croissants |
Ingredients
- 4 cups unbleached all-purpose flour, plus more for dusting (see Cook’s Note)
- 3/4 cup milk
- 1/3 cup sugar
- 1 tablespoon plus 1 teaspoon instant yeast
- 2 1/4 teaspoons fine salt
- 3 tablespoons unsalted butter, at room temperature, plus 2 1/2 sticks (10 ounces), chilled and cut into 1/2-inch pieces
- 1 large egg
Instructions
- Combine the flour, milk, sugar, yeast, salt, 3 tablespoons room-temperature butter and 1/2 cup cold water in the bowl of a stand mixer fitted with the dough hook. Mix on low speed until the dough starts to come together, about 2 minutes. Increase the speed to medium and continue to mix until completely combined and gathered into a ball that is no longer sticky to the touch, about 5 minutes. Transfer the dough to a lightly floured baking sheet, dust the top with flour and wrap in plastic wrap. Refrigerate overnight.
- The following day, put the remaining cold butter pieces (2 1/2 sticks) in the middle of a piece of parchment and dust with a generous pinch of flour. Top with another piece of parchment. With a rolling pin, pound the butter to form a 7-inch square, using a bench scraper or ruler to help even out the sides. Refrigerate while you roll out the dough.
- To roll and fold the dough: Unwrap the dough and lay it on a lightly floured work surface. Roll into a 12-inch square, dusting with flour as needed. Peel the parchment off the butter square and position the butter in the middle of the dough. Fold the top flap of dough over the butter towards you, stretching it slightly so that it reaches just past the center of the butter. Repeat with the opposite flap so they overlap by a couple inches. Turn the dough so that one of the open ends is closest to you.
- Using the rolling pin, gently pound the dough so the butter is spread out evenly in the middle of the dough. Then, roll the dough to an 8-by-24-inch rectangle. Pick up one short end of the dough and fold it back over the dough, leaving one-third of the other end of dough exposed. Then fold the exposed dough over the folded side (like folding a letter). Put the dough back on the baking sheet, cover with plastic wrap and chill so the dough relaxes and the butter firms slightly, 20 to 30 minutes.
- Lay the dough on a lightly floured work surface folded-side down. Roll in the direction of the 2 open ends, until the dough is about an 8-by-24-inch rectangle. Fold the dough in thirds again like a letter, put back on the baking sheet, cover and chill for another 20 minutes.
- Give the dough a third rolling, then fold one side to the middle of the dough and fold the other side to meet it in the middle. Fold the dough in half so it resembles a book. Put the dough on the baking sheet and cover with plastic wrap, tucking the plastic under all sides. Refrigerate for 2 hours and up to overnight.
- To divide the dough: Unwrap the dough and lightly flour the top and bottom. Roll the dough into a 10-by-35-inch rectangle. Lay the dough in front of you so the long sides are horizontal. Position a ruler lengthwise along the bottom side of the dough (the side closest to you) and mark with a paring knife every 5 inches along the length of the dough. Move the ruler to the top side of the dough (the side farthest from you) and make a mark on the dough at 2 1/2 inches. Move the ruler to the 2 1/2-inch mark, then make marks every 5 inches along the length of the dough from that point.
- Using a pizza cutter or long sharp knife, make a diagonal cut from the bottom left corner to the first mark on the top edge (at 2 1/2 inches), then cut diagonally down from that mark to the first 5-inch mark on the bottom edge of the dough, to make a triangle. Continue cutting diagonally from bottom mark to top mark and back again to create 15 triangles total (2 will be from the ends and a little smaller but still useable).
- Line 2 baking sheets with parchment. Lay one triangle on the work surface with the short side closest to you. Gently pull to extend the tip at the top. With one hand on each side of the short end of the triangle, start to roll the dough away from you towards the pointed end. Press down on the dough with enough force to make the layers stick together. Arrange the croissant on one of the lined baking sheets with the tip of the dough on the bottom. Repeat with the remaining dough triangles.
- Whisk the egg with a splash of water in a small bowl until combined. Lightly brush some of the egg wash on each croissant. (Refrigerate the remaining egg wash for later.) Put the croissants in a warm spot to proof, until puffy looking and about 1 1/2 times larger, about 2 hours.
- Position oven racks in the upper and lower thirds of the oven and preheat to 425 degrees F.
- Brush the croissants again with the egg wash. Bake for 10 minutes, then rotate the sheets from front to back and top to bottom. Continue baking until dark golden, another 8 to 10 minutes. Let cool on the baking sheets on wire racks.
Nutrition Facts
| Serving Size | 1 of 15 servings |
| Calories | 290 |
| Total Fat | 16 g |
| Saturated Fat | 10 g |
| Carbohydrates | 31 g |
| Dietary Fiber | 1 g |
| Sugar | 5 g |
| Protein | 5 g |
| Cholesterol | 54 mg |
| Sodium | 170 mg |
Reviews
Came out burnt on the bottoms and doughy in the middle. Too much butter and bake at a lower temp
I can’t believe it actually worked, first try! Flaky, full of air, buttery, and so many layers easily seen by the eye as they emerge from the oven. Yes, it’ll take hours to make them even if making the dough the night before, but if you’re hanging around the house for the day anyway, so what? Better than any commercially baked croissants and your family/friends will be impressed, too.
Great feedback haven’t tried them yet, but reading the feedback gave me the push to try them.
What a waste of ingredients, there are so many easier and less time consuming recipes..I should have tried those—very disappointed
I have attempted this recipe a couple of times, and now understand the steps. That made a world of difference. Take your time, they are well worth the time. I find now, that making these, help me to slow down and just enjoy the process.
Amazing! I made a few modifications like longer resting times in between rolling out, I used sour milk because I had it on hand, and I laminated my butter with flour to slightly raise the melting point. The base recipe would be very good too since the changes I made were pretty minor. I also think 425 is too hot, I went with 375. I ended up with light, flakey, buttery deliciousness.
Add February L pc cb upon no
Ja
Ja
DEFINITELY ADJUST TEMP AND/OR TIME. They were delicious but after reading the comments about potential burning, adjusted temperature to 400 for 19 mins. Still burnt bottoms and tops! Would make again with adjustments.
I was excited to make these even though it would take days. Dough was beautiful and rolling easy. Trouble started with the baking. I did as suggested and heated oven to 425. They started browning after ten minutes so I turned heat down to 400. Removed after another ten. Looked gorgeous. Then I removed from sheets and almost all bottoms were burnt. So disappointed. Suggestions?
Huge hit for the family. It was very time consuming but it was delicious. 10/10